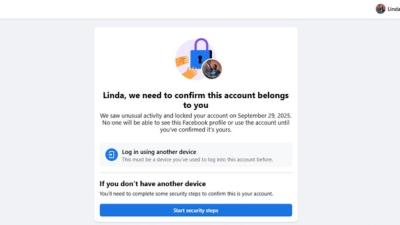
HOW TO CREATE AN INSTAGRAM ACCOUNT

Step by Step process of HOW TO CREATE INSTAGRAM ACCOUNT Step 1: First if you are on a computer go to instagram.com and if you are using a phone just download the Instagram app. Whether it’s on a phone or computer, you will see something like sign in or create an account.Click on create account. Next, you are supposed to fill the form you see on your screen by providing your phone number and username. The username, is uniquely identified by you only, so you can’t use a username that is already in existence or used by someone else, then you can put your password after that you click on sign up. Step 2: when you click on sign up, they will ask you to put your date of birth, so put your date of birth then click on next.The next one you will see is that you will be asked to indicate that you are not a robot. After that click on verify and click next. It will send you to a place where they will send you a code to the number or email that you used, and then you are supposed to put the code sent to you there, after that click on confirm and then it will open to Instagram, you can now follow the onscreen instructions. Don’t forget to check out the video tutorial below for a more hands-on guide.If you need more help, reach out to us directly through WhatsApp or Telegram or book a Zoom meeting with us via our website. Found this article helpful? Share it with others who may need to create an Instagram account too! For more Instagram and social media business management tips, subscribe to our newsletter or follow us on social media.

HOW TO CREATE AN INSTAGRAM ACCOUNT Read More »

UNEXPECTED ERROR OCCURRED FACEBOOK ADS MANAGER PROBLEM SOLVED

Step by Step guide of how to solve the problem of UNEXPECTED ERROR OCCURRED IN FACEBOOK ADS MANAGER. Step 1: First the number one reason why this problem occurs is either you don’t have an internet connection, or you have very poor internet connection, so if your internet connection is not strong, you will see this problem telling you that you can’t log in or an unexpected error has occurred or something like tha.Now swipe down and then check to make sure that you have internet access if you are not sure whether you have internet access or not. Step 2: Go to your browser and then try to access or to search for something using your browser if you see that you have internet access, I will advise you to put the phone on flight mode and turn it off again, then you click on Try Again, or if it is still giving you the same issue then you close the app and try opening it again. You will see that the issue will be resolved for you. Don’t forget to check out the video tutorial below for a more hands-on guide.Found this article helpful? Share it with others who may need to solve the problem of “unexpected error occured” in their Facebook Business Manager too! For more Facebook and social media business management tips, subscribe to our newsletter or follow us on social media.

UNEXPECTED ERROR OCCURRED FACEBOOK ADS MANAGER PROBLEM SOLVED Read More »

Facebook Ads Warning: “Ad set May Get Zero Results”? Here’s What to Do

If you’ve ever been setting up your Facebook ad campaign and suddenly saw the warning “Ad may get zero results” at the ad set level—don’t panic. This is a very common issue, and in most cases, it’s easily fixable. In this quick guide, I’m going to walk you through what causes this warning and how to resolve it, based on what has worked for me (and many of my clients). Let’s break it down together. Why You’re Seeing the “Ad May Get Zero Results” Warning The #1 reason for this warning—your daily budget is too small. While other factors like your audience size can contribute, over 70–80% of the time, it’s all about the budget. If your budget is too low, Facebook doesn’t think it can deliver enough impressions to generate results. How to Fix It Here are the steps I personally take to fix this issue: 1. Increase Your Daily Budget 2. Adjust Based on Location Different locations have different advertising costs. Don’t expect $5 to give you the same reach in the US as it does in Ghana, India, or Nigeria. 3. Let the Ad Run Anyway Sometimes, even if you see the warning, the ad will still perform well.In one of my own campaigns, I left it at $5/day despite the warning—and guess what? It delivered great results. 4. Monitor Performance Let it run for a day or two. If you’re seeing good engagement, leads, or conversions, you’re good to go. If not, adjust the budget or the ad set targeting. Bonus Tips don’t forget to check out the video tutorial for a more hands-on guide.Found this article helpful? Share it with others who may also need to solve the problem of “ads set may get zero result” too! For more digital marketing tips or tips on resolving advertising restrictions, subscribe to our newsletter or follow us on social media.

Facebook Ads Warning: “Ad set May Get Zero Results”? Here’s What to Do Read More »

How to Change the Logo of Your WordPress Website (Step-by-Step Guide)

Hey there! If you’re new to WordPress or just looking to give your site a little branding boost, you’re in the right place. In this quick tutorial, I’ll walk you through how to change the logo on your WordPress website — even if you have zero coding experience. Let’s dive right in! Step-by-Step: How to Change Your WordPress Site Logo If you need more help, reach out to us directly through WhatsApp or Telegram or book a Zoom meeting with us via our website. Don’t forget to check out the video tutorial for a more hands-on guide.Found this article helpful? Share it with others who may need to change the logo of their website in WordPress too! For more Facebook and business management tips, subscribe to our newsletter or follow us on social media.

How to Change the Logo of Your WordPress Website (Step-by-Step Guide) Read More »

HOW TO FIX FACEBOOK ADS REJECTED PROBLEM SOLVED

Have you ever had your Facebook ad rejected and wondered what went wrong or how to fix it? You’re not alone. Facebook can sometimes reject ads due to violations of their advertising policies—often without giving you a clear explanation. But don’t worry. In this article, I’ll walk you through exactly how I fix rejected Facebook ads and get them approved, based on my personal experience as a digital marketer. Let’s dive in! Step by Step guide on how to solve the problem of “FACEBOOK ADS REJECTED” Step 1: Identify the Reason for Rejection When your ad gets rejected, Facebook will show a notice like this: “We rejected your ad. It looks like your ad contains content that is not allowed on our advertising platform. This goes against our Advertising Standards or Terms of Service.” The first thing to do is click the link provided in the rejection message or go back to your Meta Ads Manager, find the rejected ad, and click the dropdown arrow next to it. Then go to Business Home. Here, you’ll see the specific policy violation. In my case, Facebook flagged my ad for violating their policy on fraud, scams, and deceptive practices. Step 2: Understand What Triggered the Rejection Facebook often misclassifies legitimate ads as scams if they contain exaggerated financial claims or promises of guaranteed income. Here’s what triggered the rejection in my ad: “Join our exclusive 4-day training and unlock the secret to earn between $500 to $2,000+ every month…” Facebook flagged this as a “get-rich-quick” claim, which is prohibited under their Investment and Financial Product & Services Policy. Even though my training is real and delivers value, specific earnings claims can raise red flags, especially if they appear too good to be true. Step 3: Edit the Problematic Content To get your ad approved: Here’s how I changed mine: ❌ Before: “Unlock the secret to earn between $500 to $2,000+ every month…”✅ After: “Join our exclusive 4-day training to learn how to become a successful digital marketer or content creator online…” By focusing on skills and opportunities instead of promises, Facebook is more likely to approve your ad. Step 4: Resubmit the Ad for Review Once you’ve edited your ad: If the ad is still rejected after editing, you can request a manual review through the “Take Action” button in Business Home. Step 5: Monitor and Stay Compliant To avoid future rejections:

HOW TO FIX FACEBOOK ADS REJECTED PROBLEM SOLVED Read More »

AD ACCOUNT DISABLED, WE WEREN’T ABLE TO PROCESS PAYMENT

Why Your Payment Might Be Declined and How to Fix It Possible Reasons for Payment Failure: In some cases, you may need to fill out a form or explicitly request authorization from your bank. Minimum Account Balance Requirement: Banks often require a certain minimum amount to remain in your account. If you try to pay an amount that leaves the balance below this minimum, the transaction may fail. Trying to Pay the Full Amount (Including Decimals): Sometimes, trying to pay an exact amount like $99.89 might fail. Solution: Try paying a rounded-down amount like $99, leaving out the decimal part. New Card or Bank Account Restrictions: If the card or account is new, your bank might not have authorized online transactions yet. Step- by -Step guide on how to solve the problem of “AD ACCOUNT DISABLED, WE WEREN’T ABLE TO PROCESS PAYMENT” Step 1-Try Paying a Smaller Amount: Step 2-Remove the Decimal: This often helps when the payment fails despite having enough funds. If you owe $99.89, try paying $99 instead. Step 3: Use a Different Card: If none of the above works, try a different card that you know works with online payments. Step 4: Contact Your Bank: If you need more help, reach out to us directly through WhatsApp or Telegram or book a Zoom meeting with us via our website. Don’t forget to check out the video tutorial for a more hands-on guide. Found this article helpful? Share it with others who may need to delete their Facebook Business Manager too! For more Facebook and business management tips, subscribe to our newsletter or follow us on social media.

AD ACCOUNT DISABLED, WE WEREN’T ABLE TO PROCESS PAYMENT Read More »

How to Promote Your YouTube Video with Google Ads (Step-by-Step Guide)

Promoting your YouTube videos can be one of the fastest ways to grow your channel, drive traffic to your website, or boost sales. In this article, I’ll walk you through two simple methods you can use to promote your YouTube videos using Google Ads, even if you’re a complete beginner. Let’s break it down step by step. Method 1: Promote Directly from YouTube Studio (The Easier Option) This method is great for beginners or those who want a simpler, faster process. Step 1: Go to YouTube Studio Step 2: Click “Get Started” Step 3: Choose Your Objective You’ll be asked what your goal is: Pick the one that best fits your goal. Step 4: Select Your Video Click “Add” and choose the video you want to promote. Step 5: Set Your Landing Page If your goal is to drive traffic to a course or website, paste the URL where viewers will land after clicking the ad. Step 6: Set Location & Language Step 7: Set Budget & Duration Method 2: Promote Using Google Ads Manager (For More Control) This method gives you more advanced features and detailed targeting options. Check the YouTube video below for method 2 Don’t forget to check out the video tutorial for a more hands-on guide.Found this article helpful? Share it with others who may need to promote their YouTube videos with google ads ! For more YouTube and business management tips, subscribe to our newsletter or follow us on social media.

How to Promote Your YouTube Video with Google Ads (Step-by-Step Guide) Read More »

[]